
Set up your Bitaxe in minutes
The complete step-by-step guide: connect Wi-Fi, enter pool and wallet and start mining – with screenshots, FAQ and tips.
This guide shows you how to set up a Bitaxe from the first plug to a visible hash rate. The steps are short, unambiguous and free of jargon – ideal if this is your first home miner.
The device in short
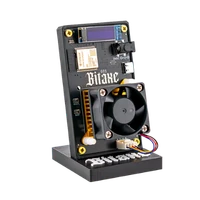
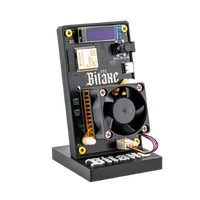
The Bitaxe is a frugal solo miner for home use. You connect it to your 2.4 GHz Wi-Fi, enter the pool details (stratum host/port) and use your Bitcoin address as the stratum user. After that you check in the dashboard whether shares are arriving.
Performance & temperature
From the factory the Bitaxe runs at 525 MHz / 1150 mV and delivers around 1.3 TH/s at about 15 W. On individual devices the temperature is higher in the first few minutes; from 65 °C upwards it is worth checking placement and airflow – see 5. Start & monitoring and 8. Safety.
If you bought your Bitaxe from us: thank you for your trust.
Have ready
- your Bitaxe home miner
- the credentials for your 2.4 GHz Wi-Fi
- your Bitcoin address (on-chain) – not a Lightning address
- the power supply with the round DC (barrel) plug
Preparation
for absolute beginners
In this step you get your Bitaxe ready:
You unpack everything, check the contents, choose a suitable spot and connect the power supply. No prior knowledge needed – we explain every step.
STEP 1
UNPACK
Open the box carefully. Take the parts out and remove the protective films.
STEP 2
CHECK THE CONTENTS
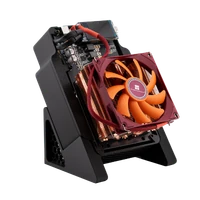
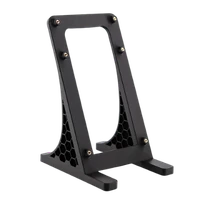
The box contains the Bitaxe, the Bitaxe stand, the PSU (power supply) and an info flyer. If something is missing or damaged, do not switch the Bitaxe on and contact our support or the shop you bought it from.
STEP 3
VISUAL CHECK
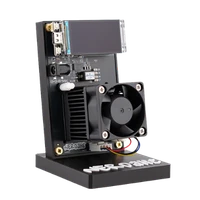
Check the housing and the fan. Are all connectors clear? Is anything loose? Note that the display is only plugged on – that is a feature, not a fault.
STEP 4
CHOOSE A SPOT
Place the Bitaxe on a firm, level surface. Leave at least 10 cm of air at the intake and the exhaust. Avoid moisture and heat sources. A socket and Wi-Fi should be within reach.
STEP 5
THE RIGHT POWER SUPPLY
Use only the supplied PSU. Compare voltage and connector with the label on the device (round DC/barrel plug). USB-C is not used for power.
STEP 6
PREPARE THE POWER SUPPLY
Do not plug the PSU into the socket yet. Untangle the cable calmly so that nothing is under tension.
STEP 7
CONNECT THE POWER SUPPLY TO THE DEVICE
Insert the round DC plug straight into the power input on the Bitaxe. Do not force the plug and do not kink the cable.
STEP 8
CONNECT POWER
Plug the PSU into the socket. The display and the fan usually start after 1–2 seconds.
STEP 9
CHECK THE START SCREEN
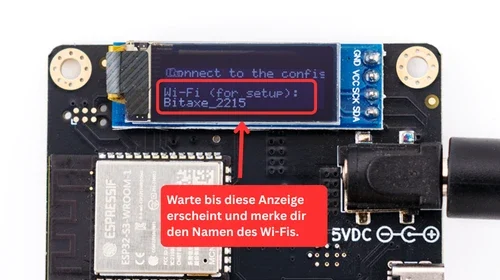
The display shows the Wi-Fi name (SSID), something like Bitaxe_XXXX. Note that name. If nothing appears, check the plug and the socket. Contact support if it stays blank.
STEP 10
On to the Wi-Fi setup
Continue with connecting Wi-Fi below.
Quick start in 3 steps
Mining in three steps
Set up a Bitaxe before? Here is the short version as a refresher.
1. Connect Wi-Fi: join Bitaxe_XXXX. If no portal opens, go to http://192.168.4.1.
2. Enter pool & wallet: in the pool settings enter host and port. Stratum user = your BTC address (optionally .worker), save, restart.
3. Check in AxeOS: hash rate running, accepted shares rising, rejects < 2–3 %, temperature < 70 °C.
Connect Wi-Fi
Step 1: if you have already done the preparation, the device is plugged in and running. If you are starting here: put the power supply into the socket. Display and fan usually start immediately (1–2 s).
Step 2: the display shows the Bitaxe’s Wi-Fi name. Open the Wi-Fi list on your phone or laptop and select Bitaxe_XXXX (here: Bitaxe_2215).
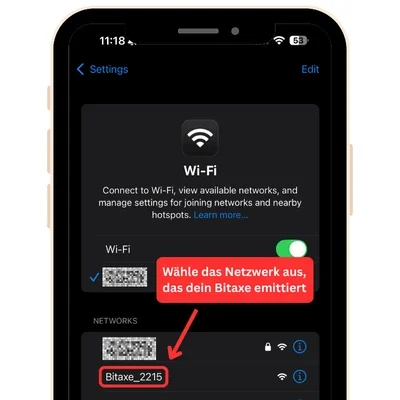
Step 3: the setup page opens automatically. If it does not, open your browser and type http://192.168.4.1.
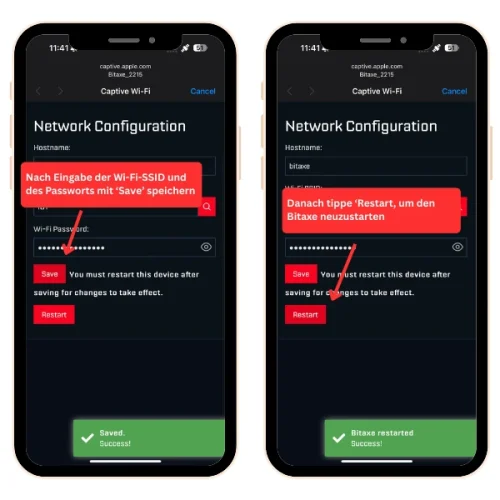
Step 4: enter your Wi-Fi SSID and password exactly. If unsure, tap the eye icon to show and check the password.
Step 5: save with “Save”.
Step 6: tap “Restart” and your Bitaxe reboots.
Step 7: the device joins your home Wi-Fi and already starts mining. The display shows an IP address (for example 192.168.1.123). Note it down – you will use it to open the AxeOS dashboard.
Enter pool & wallet
For beginners: please fill in the fields exactly as shown here. The general settings (above all the mining pool and your Bitcoin address) can be adjusted as you like. Our recommendation: enter our solo pool pool.opensourceminers.de (port 3333, 0 % fee, servers in Frankfurt; the pool configurator provides the values ready to copy) – unless you run your own pool with a LiquidBox V5. To do that, open the pool settings in the dashboard.
Step 1: open the AxeOS dashboard at the IP address shown on the Bitaxe display (for example http://192.168.20.122).

Step 2: switch to Pool Settings.
Step 3: enter the stratum host (pool address): pool.opensourceminers.de.
Step 4: enter port 3333.
Step 5: enter the stratum user. Delete the default Bitcoin address and paste your own BTC address (on-chain, no spaces).
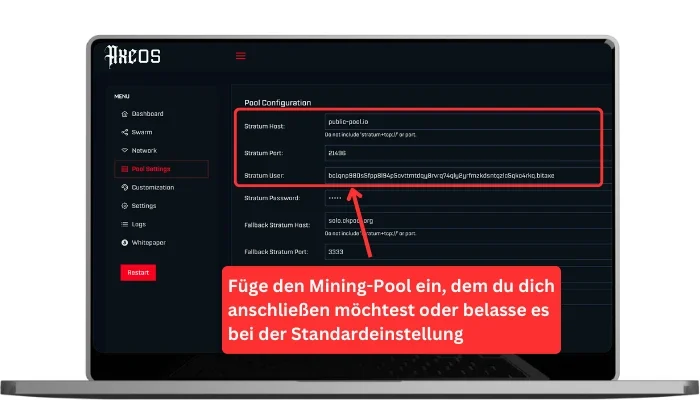
Step 6 (optional): add a worker label after the address, for example .bitaxe1 (handy with several miners).
Step 7: enter a password if needed – if your pool does not require one, use x.
Step 8: store your settings with “Save”.
Step 9: click “Restart” to reboot your Bitaxe.

Step 10: the miner restarts and connects to the pool.
Start & monitoring
In short: here you check whether your Bitaxe is running correctly. The dashboard shows the hash rate, the accepted shares and the temperature. Take your time with these values. If something looks unusual, the notes below will help.
Step 1: the dashboard should already be open. If not, open your browser and enter the IP address shown on the Bitaxe display (for example http://192.168.20.122).
Step 2: check the shares. Accepted should be rising, rejected should stay as close to 0 % as possible.
Step 3: check the temperature in the dashboard.
Step 4: if no values appear, check host, port and BTC address on the pool tab. Improve the Wi-Fi signal if needed and restart the Bitaxe.
Step 5: if the hash rate is stable and rejects stay below 2–3 %, your miner is working correctly.
Done – your Bitaxe is running.
Congratulations! The basic setup is complete and your miner is working. The chapters below are optional – they help with tuning (performance and temperature) and with solving problems.
Update the firmware
In short: here you update the firmware of your Bitaxe. That can fix bugs and improve stability.
If something goes wrong
- The web flasher does not find a device – use Chrome or Edge, check that the USB cable carries data (not a charge-only cable) and try another port.
- The page is unreachable after the update – wait one or two minutes, then open the IP again.
- The update aborts – check the file and version and try method A again.
Method A – web flasher (recommended and easiest)
• Connect the Bitaxe via USB-C directly to your computer – a data cable, not a USB hub. The device can keep running.
• Open flasher.bitaxe.de in Chrome, Edge or Opera on desktop.
• Click your device tile. “AxeOS original” is preselected; switch at the top if you want the optimized OSM-OS builds.
• Leave “Keep configuration” ticked – then Wi-Fi, pool and Bitcoin address survive the update.
• Click “Install firmware” and pick your miner’s serial port in the browser dialog (USB JTAG/serial, CP210x or CH340, depending on the board).
• Wait until the bar reaches 100 %. The miner reboots and is back on the network after about 30 seconds.
Firefox and Safari cannot flash over serial. There you download the update files and apply them in AxeOS under System.
Method B – online update (in the dashboard)
• Switch to Settings and click Check to look for newer firmware.
• Under Current Version you see, for example, v2.6.1 (currently installed). Press Check to find the latest version.
• If a new version is offered (for example v2.7.0), download the two linked files and save them locally:
• esp-miner.bin – firmware for the controller
• www.bin – web interface (AxeOS)
• Update the web interface first: in the Update Website area click +Browse, choose www.bin and confirm. AxeOS installs the web UI and reloads the page once.
• Then update the firmware: in the Update Firmware area click +Browse, choose esp-miner.bin and confirm. Wait about 60 seconds; the Bitaxe reboots automatically.
Done – the current firmware is running.
The order matters: www.bin first, then esp-miner.bin.
Troubleshooting & FAQ
In short: here you find quick solutions for the most common problems. Work through the points in order and check after each step whether your Bitaxe is running correctly again.
The Wi-Fi network “Bitaxe_XXXX” does not appear.
• Move your phone or laptop closer to the Bitaxe (2–3 m) and scan for networks again.
• Unplug the power supply briefly and plug it back in.
The captive portal does not open automatically.
My Bitaxe does not find my Wi-Fi.
• If necessary, separate the SSIDs for 2.4 GHz and 5 GHz by giving them different names.
• Check your router settings for Wi-Fi isolation (for example “AP/client isolation”, “intra-BSS blocking”, “access intranet”) and disable it so devices on the same network can talk to each other; on guest networks also allow access to the home network.
The Wi-Fi password is shown as wrong.
• Watch capitalisation and any spaces.
• Use the “show password” function to avoid typos.
After the Wi-Fi setup I cannot reach the Bitaxe any more.
• Check the spelling of the network name and password.
• Perform a hard reset (reset the configuration to factory defaults – for example with the web flasher and Keep configuration off, which is a clean flash) if wrong data was stored and no captive portal appears any more.
I cannot find the Bitaxe’s IP on my network.
• Read the IP address directly from the display after the Wi-Fi setup and open it in a browser.
Connecting with an iPhone or Mac fails.
• On the iPhone, disable the automatic switch under Settings → Mobile Data → Wi-Fi Assist (scroll to the bottom).
• On the Mac, temporarily disable automatic connection to other networks in the Wi-Fi list.
No hash rate is shown after starting.
The reject rate is high (above 1 %).
• Check stratum host and port against the pool configurator – stale work caused by dropped connections is the most common cause.
The Bitaxe gets too hot.
• In Settings, set the frequency to 490 MHz and the core voltage to 1100 mV (factory values: 525 MHz / 1150 mV) and only work your way back up once the ASIC temperature stays below 65 °C.
• Avoid running the fan permanently at 100 % and make sure air circulates well.
The connection keeps dropping.
• Put the Bitaxe somewhere with a strong Wi-Fi signal and as few walls, metal surfaces or water containers in between as possible.
• Avoid chains of repeaters and connect the Bitaxe to the main SSID if you can.
The Bitaxe dashboard does not load or times out.
• As a test, disable ad blockers or tracking protection in your browser (for example Brave’s “Shields”) or use a Chromium browser such as Chrome or Edge.
• Clear the browser cache.
What is a hard reset and how do I do one?
• Connect the Bitaxe via USB-C and open our web flasher in Chrome, Edge or Opera.
• Pick your device tile and untick “Keep configuration”. The flasher then writes the complete factory image.
• Click “Install firmware”, choose the serial port and wait until it reaches 100 % – do not unplug the cable, keep the browser open.
• Set the device up again afterwards: join its own Wi-Fi (Bitaxe_XXXX), then enter Wi-Fi, pool and Bitcoin address again.
Note down pool host, port and your Bitcoin address beforehand – a clean flash wipes them.
Safety, power & location
In short: here you learn how to place the Bitaxe safely, power it correctly and keep it running stably with very little care.
Location
- A firm, level surface with air circulation all around.
- No moisture or heat sources; out of reach of children and pets.
Power supply
- Use only the recommended PSU with the round DC (barrel) plug.
- Insert the plug straight; do not kink the cable or put it under tension.
- Disconnect power before moving the device.
Operation & care
- Check the temperature regularly; if it runs high, choose a cooler spot.
- Remove dust (fan and heatsink) and keep the air paths clear.
- Do not force menus or switches; insert plugs without force.
Products for your Bitaxe setup
If you want to pick matching hardware or accessories right after the guide, these are the most useful next steps.
Tools for the setup
Wenn du nach der Anleitung direkt passende Hardware oder Zubehör auswählen willst, sind diese Seiten die wichtigsten nächsten Schritte.
Help after the Bitaxe setup
After the first start these topics matter most for stable operation, pool choice and optimisation.