
Bitaxe hashrate error: what the value in AxeOS means and what helps
31 January 2026 · 10 min read · Updated on 26 September 2026

In the hashrate card of AxeOS, next to the hashrate, sits a small value called Error. It causes a lot of support questions because older guides explain it wrongly: as the gap between measured and expected hashrate. That has not been true since AxeOS 2.11. The error comes straight from the chip and counts faulty hashes. This article explains what the value means, which level is normal, how to tell it apart from the second important figure, the gap to “Expected”, and what to do about the four typical causes.
What the error in AxeOS measures
Since AxeOS 2.11 the firmware no longer derives the hashrate from shares but reads it every second from counter registers in the chip. The chip counts two things: all hashes computed and the hashes in which it detected an error. Error is the second divided by the first, in percent. Hover over the question mark next to the value and AxeOS explains it itself:
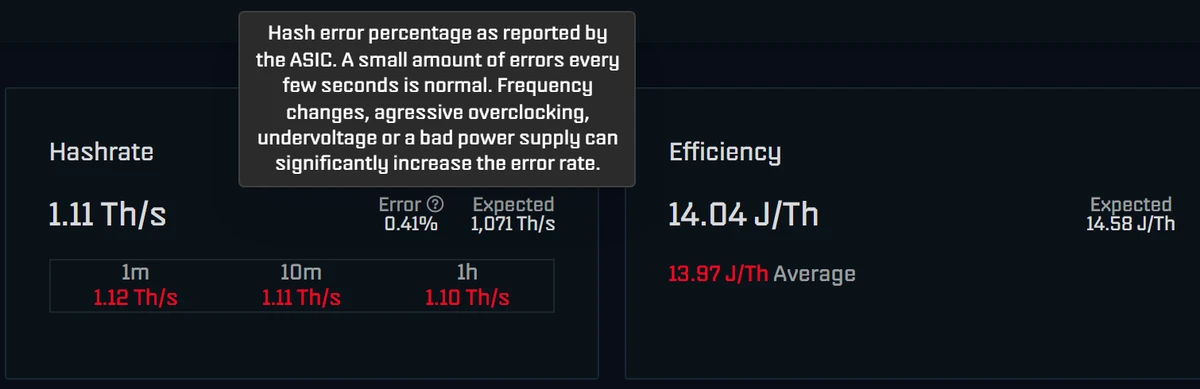
A small amount of errors every few seconds is normal. Frequency changes, aggressive overclocking, undervoltage or a bad power supply can raise the error rate significantly. The value has nothing to do with the pool, the Wi-Fi or rejected shares; one of the firmware developers puts it plainly: the error rate is completely separate from whatever the pool connection does (discussion).
The second figure: hashrate against Expected
Next to the error is Expected, the hashrate to expect at your clock. AxeOS calculates it as clock times cores times chips. The BM1370 in the Gamma has 2,040 cores; at 525 MHz that gives 1,071 GH/s, or 1.07 TH/s. Below are the averages of the measured hashrate over one minute, ten minutes and one hour.
The two figures complement each other: the error shows whether the chip computes cleanly, the comparison of the hourly average with Expected shows whether it computes as much as it should. If the hourly average reaches at least 95 % of Expected, the setting is stable. That is the same threshold the common benchmark tools use. If the hashrate is a little above Expected, that is not a fault; the measured value scatters around the calculated one.
| Reading | What it shows | Fine | Act when |
|---|---|---|---|
| Error | share of faulty hashes according to the chip | permanently below 0.1 % very good, a few tenths unremarkable | permanently at 1 % or more, or clearly rising |
| Hashrate 1h against Expected | whether the chip delivers full performance | at least 95 % of Expected | permanently below |
| Rejected shares | problems between miner and pool | below 1 % | permanently above |
Short error spikes are normal, especially right after a restart or a change to clock or voltage. Judge it like the hashrate, over an hour. The chart can show the error history under “Percentage (%)”. On devices with several chips the value covers all chips together.
Which error is normal?
Every chip is a little different, and a small share of errors is sometimes unavoidable. The firmware developers call values below 0.1 % good and spikes expected. Retailer guides draw the line more generously and consider up to 2 % healthy. In practice this has proven useful:
- Below 0.1 %: very good, nothing to do.
- 0.1 to below 1 %: unremarkable, as long as the hourly average hashrate reaches at least 95 % of Expected.
- 1 % and more, permanently: the setting is no longer clean. Usually the voltage is not enough for the clock, or heat or the power supply are involved.
- Rising over days: something has changed, for example a clogged cooler, a warmer room or an ageing power supply.
More important than the second decimal is the comparison with your own normal state. After setup, note the error and the hourly average of your device at factory settings; then you will spot any change immediately.
The four causes in the order to check them
1. Voltage too low for the clock
The most common cause, almost always after overclocking or undervolting. Every chip needs a minimum voltage for a given clock; below it the error rises and the hashrate falls below Expected. Out of the box a Gamma runs 525 MHz at 1150 mV and has headroom. Fix: raise Core Voltage in Settings by 10 to 20 mV or lower the clock by one step. How to find the right combination is in the overclocking guide.
2. Heat
A hot chip computes less cleanly. For continuous operation up to 65 °C at the chip and up to 85 °C at the voltage regulator are good. From 70 °C the dashboard warns. Above 75 °C at the chip or above 105 °C at the regulator the overheat protection kicks in: AxeOS stops mining, sets the fan to 100 % and then carries on with 100 MHz less clock and 100 mV less voltage. The dashboard then shows “Device has overheated - See settings”, the display “DEVICE OVERHEAT!”. Causes are usually the location, dust, a fan without automatic control or too much clock. Cooling tips are in making a Bitaxe quieter.
3. Power supply at its limit
If the input voltage sags under load, the voltage regulator can no longer hold the core voltage cleanly. In the dashboard you see it in the Power card: “Input Voltage” clearly below nominal, below 95 % of it with the warning “Danger: Low Voltage” (on the Gamma below 4.75 V, on 12 V devices below 11.4 V), and a “Measured ASIC Voltage” clearly below the set value. If the voltage drops further, the regulator switches off and AxeOS reports “Power Fault Detected. Check your Power Supply.” More in power supply for the Bitaxe.
4. Frequency changes and freshly started devices
Right after a restart or a change to clock or voltage the error often shows higher values for a moment while the frequency ramps up in small steps. That is not a problem. Wait an hour and judge then.
Not on this list is the Wi-Fi. Network dropouts do not raise the error; they lead to rejected or stale shares and gaps at the pool. For that, Bitaxe connected but not mining is the right place.
The hashrate registers: every domain on its own
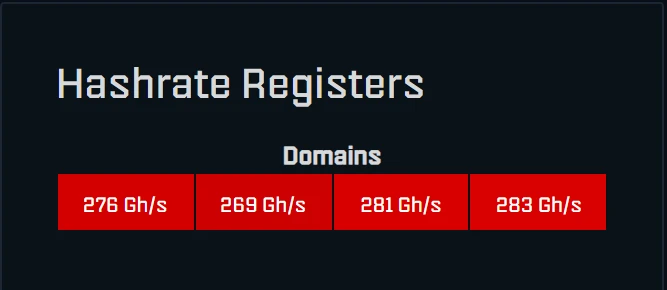
Further down the dashboard, the Hashrate Registers card shows the hashrate per domain of the chip; the BM1370 has four, and devices with several chips show each chip. Hover over a chip and the tooltip shows its error counter (“Error count”). The domains vary slightly against each other. If one domain delivers clearly less than the others for a long time, that part of the chip is not computing fully; the steps above help, and if it stays that way, it is a case for our support.
Hashrate 0 GH/s: what is behind it
If the hashrate is zero, the chip is not computing at all. That has different reasons from a high error:
| What you see | Cause | What to do |
|---|---|---|
| “Mining is paused” in the dashboard | pause button at the top right pressed | resume or restart |
| Hashrate 0, fan at 30 %, log line “All configured pools unreachable, pausing mining to conserve power.” | no pool reachable; since 2.14 AxeOS pauses automatically and retries every 30 seconds | check pool details and internet, add a fallback pool |
| “Device has overheated”, fan 100 % | overheat protection active | let it cool, fix the cause, check Settings |
| Cards show “Not available - Power fault” | voltage regulator switched off | check power supply and plug, restart |
| Only the setup Wi-Fi is visible | no Wi-Fi; the miner only starts hashing once connected | enter the Wi-Fi again |
The Logs page in AxeOS shows in real time what is happening. Typical lines are “WiFi disconnected, attempting to reconnect...” for Wi-Fi problems and “Failed to receive JSON-RPC line, reconnecting...” when the connection to the pool breaks. You can download the file there and send it to our support.
Check it in five minutes
- Open the dashboard and compare the hourly average (“1h”) with “Expected”. At least 95 %: good.
- Look at the error: permanently below 1 %, better below 0.1 %: good. Ignore spikes right after changes.
- Heat card: chip up to 65 °C, regulator up to 85 °C. If the dashboard shows “Device has overheated”, it was the overheat protection.
- Power card: input voltage close to nominal, no “Danger: Low Voltage” warning.
- Overclocked? Set clock and voltage in Settings back to the values marked “(Default)” and watch for an hour.
Why a clean clock beats a high one
More clock with too little voltage looks good in “Expected” but delivers less. An example from a series of measurements with a NerdQaxe++: at 740 MHz and too low 1150 mV the device only delivered 66 % of its expected hashrate and used more energy per terahash than at factory settings. With a little more voltage or a little less clock the same hardware delivers more real hashes. So when tuning: only once error and hourly average are right does the number next to Expected count. What that means for your chance of a block is shown in finding a block with a Bitaxe.
Frequently asked questions about the hashrate error
What is the hashrate error on a Bitaxe?
Which error is normal on a Bitaxe?
Is the error the gap to the expected hashrate?
Why is my hashrate lower than Expected?
Why is my hashrate above Expected?
Does a higher error lower my chance of a block?
What to do about a high error after overclocking?
At which temperature does AxeOS step in?
Why does my Bitaxe show 0 GH/s?
Do Wi-Fi problems raise the error?
What does “Power Fault Detected” mean?
Does this also apply to the Nerdaxe and NerdQaxe?
Read more
Nerdaxe Gaia: what the BM1373 miner can do, which firmware to run and who it is for
A single BM1373 in the familiar Nerdaxe format: factory settings from the source code, hashrate and power draw with every documented figure, the 12-volt power supply, OSM-OS from the flasher, setup, overclocking up to the current limit, block odds and electricity cost, plus a comparison with the Nerdaxe Gamma, Bitaxe GT and NerdQaxe++.
Guides & knowledgeSetting up Stratum V2 on a Bitaxe: encrypted solo mining in five fields
Since AxeOS 2.14 every Bitaxe speaks Stratum V2, and since September 2026 so does the Bitaxe Pool. This guide walks through the AxeOS fields one by one, shows how to set up the fallback and verify the connection, and lists what goes wrong when no shares arrive. For Bitaxe, NerdQaxe and large ASICs.
Guides & knowledgeNerdQaxe++ review: 4.8 TH/s from four BM1370, and who should upgrade from a Bitaxe
Four BM1370 on one board, 4.9 TH/s expected out of the box, about 76 W, two fans and NerdOS in the browser: we put the NerdQaxe++ in context. Factory values from the firmware, board revisions, noise, running costs, block odds, setup in NerdOS and the comparison with the Bitaxe Gamma, GT and 702, Copper Pro, Hydro, NerdQX and NerdOctaxe.