
Bitaxe power consumption: watts, kWh and electricity cost for every model
13 January 2026 · 10 min read · Updated on 26 September 2026

A miner runs around the clock, so every watt counts 8,766 hours a year. The maths is simple; the numbers that go into it are not always reliable: AxeOS shows an estimate, manufacturers and retailers quote figures under unclear conditions, and overclocking changes everything. This article gives the power draw of every model in our shop with its source, works out the cost per day, month and year, and puts it next to what a miner earns on average.
How to calculate power consumption
Two steps are enough: watts × hours ÷ 1000 = kWh and kWh × electricity price = cost. This article assumes continuous operation; a year has 8,766 hours (365.25 days), a month one twelfth of that, about 730 hours. We use an electricity price of €0.30 per kWh; the mining calculator starts with the same value, and you can enter your own there. For a Gamma at 17 W:
- per day: 17 W × 24 h = 408 Wh = 0.41 kWh, so 12.2 cents
- per month: 17 W × 730 h = 12.4 kWh, so €3.73
- per year: 17 W × 8,766 h = 149 kWh, so €44.71
We measured the 17 W at the wall socket, so the power supply is included. That matches other measurements: a US retailer measured 17.8 W on a Gamma 602 at factory settings. This is how the electricity price changes the result:
| Electricity price | Gamma per day | per month | per year |
|---|---|---|---|
| €0.20 per kWh | 8.2 cents | €2.48 | €29.80 |
| €0.25 per kWh | 10.2 cents | €3.10 | €37.26 |
| €0.30 per kWh | 12.2 cents | €3.73 | €44.71 |
| €0.35 per kWh | 14.3 cents | €4.35 | €52.16 |
| €0.40 per kWh | 16.3 cents | €4.97 | €59.61 |
Electricity cost for every model
The table lists the hashrate each device runs at with factory firmware settings, the power draw with its source and the cost at €0.30 per kWh. Where no independent measurement exists, it shows the figure from the designer, manufacturer or retailer. Such figures are usually taken under favourable conditions; at your wall socket it may be a little more.
| Device | Hashrate at factory settings | Power (source) | kWh per month | Cost per month | Cost per year |
|---|---|---|---|---|---|
| Bitaxe Gamma 601 | 1.07 TH/s | 17 W (our measurement at the wall) | 12.4 | €3.73 | €44.71 |
| Bitaxe Copperzilla | 1.53 TH/s (750 MHz) | 23 to 30 W (Gamma measurements at 750 MHz) | 16.8 to 21.9 | €5.04 to €6.57 | €60 to €79 |
| Nerdaxe Gaia | 2.40 TH/s | 30 W (manufacturer) | 21.9 | €6.57 | €78.89 |
| Bitaxe GT 801 | 2.14 TH/s | 43 W ±10 % (retailer) | 31.4 | €9.42 | €113.08 |
| Bitaxe Supra Hex 702 | 3.75 TH/s | 75 to 90 W (designer, retailer) | 54.8 to 65.8 | €16.44 to €19.72 | €197 to €237 |
| NerdQaxe++ | 4.90 TH/s | about 76 W (designer) | 55.5 | €16.66 | €199.86 |
| NerdQX | 6.34 TH/s (777 MHz) | 130 W at 7.2 TH/s (single report), up to 160 W at 8 TH/s (manufacturer) | 95 to 117 | €28.49 to €35.06 | €342 to €421 |
| NerdOctaxe | 11.4 TH/s | 160 to 200 W (manufacturer) | 117 to 146 | €35.06 to €43.83 | €421 to €526 |
| NerdOctaxe Hydro | 11.3 TH/s measured | 155 W at 700 MHz / 1190 mV (review) | 113.2 | €33.97 | €407.62 |
| Avalon Nano 3S | 6 TH/s (manufacturer) | 140 W (manufacturer) | 102.3 | €30.68 | €368.17 |
A few rows need a sentence of explanation. The Copperzilla is a Gamma that runs at 750 MHz and 1200 mV from the factory under OSM-OS. There is no independent measurement for exactly that operating point; measurements with a Gamma at 750 MHz came to 23 W at 1150 mV (as shown in AxeOS) and 30 W at 1250 mV (measured), and the Copperzilla at 1200 mV sits in between. The Nerdaxe Gamma has the same chip as the Bitaxe Gamma. Under NerdOS it runs at 515 MHz from the factory and so lands at Gamma level; with OSM-OS the firmware sets 650 MHz, which is 1.33 TH/s, and a Gamma test series at the same voltage shows between 19.7 W at 625 MHz and 21.4 W at 700 MHz in AxeOS. NerdQaxe++ Hydro and Copper Pro carry the same four BM1370 chips as the NerdQaxe++; their draw depends mainly on the clock you set. For the NerdQX the factory draw is not documented, the figures in the table apply to higher clocks. All devices side by side with price and availability are in the miner comparison.
What AxeOS shows versus what the wall meter says
The power figure in the Power card is not a measurement at the wall. On the Gamma, GT and Supra Hex the voltage regulator only measures what it delivers to the chips. For the rest of the board AxeOS adds a fixed amount: 5 W on the Gamma, 10 W on the GT and 25 W on the Supra Hex. The developers note in the source code themselves that this is an approximation. Power supply losses are missing entirely.
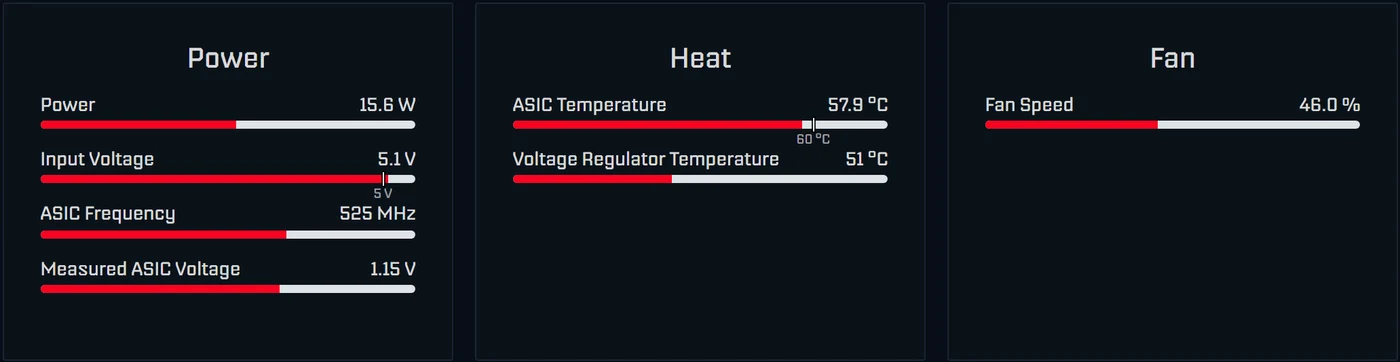
Depending on the unit, AxeOS shows 15 to 19 W on a Gamma, while our wall measurement came to about 17 W; how big the gap is depends on the power supply and the operating point. Documented examples of the gap:
| Device and setting | Firmware reading | At the wall | Source |
|---|---|---|---|
| Bitaxe Gamma, 494 MHz / 1020 mV | 15 W | 17.1 W | ESP-Miner issue 908 |
| NerdQaxe++, 650 MHz / 1140 mV | 88.4 W | 94 W | NerdQAxePlus issue 297 |
| NerdQaxe++, 750 MHz | 113.2 W | 132.2 W | NerdQAxePlus issue 345 |
NerdOS shows the power in the “Power Usage” card. On the NerdQaxe++ up to revision 6 and on the NerdOctaxe the voltage regulator measures its own input power there; that is closer to the truth, but power supply losses are missing here too. The Nerdaxe Gamma calculates like the Bitaxe Gamma, regulator power plus 5 W. For your electricity bill only the wall reading counts. All other dashboard readings are explained in AxeOS explained.
How to measure it yourself
- Plug an energy meter between the wall socket and the power supply. Many meters count kWh as well, which says more than a momentary reading.
- Measure for at least 24 hours and only read the value once the miner is warm. Fan and temperature vary over the day.
- Write down the operating point: frequency, core voltage, room temperature and the 1h hashrate from the dashboard. Only then can you compare measurements later.
- Work out the efficiency: watts at the wall divided by TH/s gives J/TH. For a Gamma at 17 W that is about 16 J/TH using the expected 1.07 TH/s, and about 14 J/TH with the 1.2 TH/s often measured in everyday use.
What overclocking and undervolting cost
On a Gamma you can move the power draw in both directions. The table shows measured operating points of individual devices. The values come from different measurements; strictly comparable are only rows from the same source.
| Frequency / core voltage | Hashrate | Power (how measured) | J/TH | Power per year |
|---|---|---|---|---|
| 525 MHz / 1150 mV (factory) | 1.07 TH/s | 17.8 W (measured, US retailer) | 16.6 | €46.81 |
| 600 MHz / 1150 mV | 1.22 TH/s | 20.1 W (same test series) | 16.5 | €52.86 |
| 625 MHz / 1250 mV | 1.27 TH/s | 25.2 W (same test series) | 19.8 | €66.27 |
| 750 MHz / 1150 mV | 1.53 TH/s | 23.3 W (AxeOS reading, benchmark tool, single device) | 15.3 | €61.27 |
| 625 MHz / 1100 mV | 1.27 TH/s | about 18.5 W (AxeOS reading, single device) | 14.6 | €48.65 |
The lesson: more clock at the same voltage costs little. 600 instead of 525 MHz gives 14 % more hashrate for about €6 more electricity a year. More voltage is expensive: 625 MHz at 1250 mV gives 19 % more hashrate for about €19 more a year and clearly more heat, because power rises roughly with the square of the voltage. The other way round, a chip that gets by with less voltage saves money: one good unit ran 625 MHz at only 1100 mV with 14.6 J/TH, more efficient than factory settings. On a Gamma the floor is 1000 mV; the voltage regulator does not accept anything below that.
Two values on the dashboard tell you whether a setting is stable: the 1h hashrate should reach at least 95 % of “Expected”, and the Error should stay below 0.1 %. The step-by-step approach is in the overclocking guide, what the Error means in Bitaxe hashrate error explained. If quiet is what you want most, lower clock and voltage together; how is covered in making a Bitaxe quieter. When overclocking, the power supply often sets the limit rather than the chip: power supply for a Bitaxe.
Earnings versus electricity cost
A Bitaxe is not a cash machine, and that can be put into exact numbers. On average each terahash per second currently earns about 48 satoshis a day (difficulty 132.76 T, as of 26 September 2026). For a Gamma at 1.07 TH/s that is about 51 satoshis a day or 18,600 a year, about €13.80 at €73,876 per BTC. The electricity for the same year costs €45. The last column shows the electricity price at which the expected value covers the power:
| Device (hashrate, power) | Expected value per year | Power per year at €0.30 | Breaks even at an electricity price of |
|---|---|---|---|
| Bitaxe Gamma (1.07 TH/s, 17 W) | €13.80 | €44.70 | 9.2 cents per kWh |
| Nerdaxe Gaia (2.40 TH/s, 30 W) | €30.90 | €78.90 | 11.7 cents per kWh |
| Bitaxe GT 801 (2.14 TH/s, 43 W) | €27.50 | €113.10 | 7.3 cents per kWh |
| NerdQaxe++ (4.90 TH/s, 76 W) | €63.00 | €199.90 | 9.5 cents per kWh |
| NerdOctaxe Hydro (11.3 TH/s, 155 W) | €145.30 | €407.60 | 10.7 cents per kWh |
At €0.30 per kWh no device covers its power, and the pool does not change that. A pool only changes the distribution, not the amount: in a shared pool you get the roughly 51 satoshis a day in tiny amounts, minus the fee. Solo mining pays nothing almost all the time and, with a chance of about 1 in 16,900 per year, a whole block, currently worth about €232,000. That is why many owners run their Bitaxe solo: the electricity is the stake, the block is the prize. The maths behind it is in finding a block with a Bitaxe, the pool comparison in choosing a Bitaxe mining pool. Our own solo pool pool.bitaxe.de charges a 0 % fee: host stratum.bitaxe.de, port 3333.
The numbers depend on the bitcoin price and the difficulty. The mining calculator fetches both live and uses your electricity price.
Waste heat, solar power and pausing
The miner heats the room
Every watt a miner draws ends up as heat in the room. A Gamma is a 17 W heater, a NerdQaxe++ one with about 76 W. If you heat with electricity, it replaces heating power one to one in winter, and during that time the miner costs you hardly anything extra. With a heat pump, which turns one kilowatt hour of electricity into several of heat, heat from the miner is more expensive than heat from the heating system. In summer that heat also has to leave the room.
Surplus from a solar system
If the miner runs on power your solar system would otherwise feed into the grid, each kilowatt hour only costs you the feed-in tariff you give up, not the full electricity price. The last column of the table above shows whether that is enough: if your feed-in tariff is below it, the expected value covers the power, but only while there really is a surplus. For running directly from solar or a battery the 12 V devices are the better fit; since AxeOS 2.15 the GT and Supra Hex accept up to 14.8 V at the input. More on that in power supply for a Bitaxe.
Pausing, for example during expensive hours
Since AxeOS 2.14 there is a Pause Mining button at the top right. It switches off the chip’s core voltage and disconnects from the pool. ESP32, Wi-Fi and display stay on, the fan runs at 30 %. A pause does not survive a restart. You can automate it through the miner’s API, with POST /api/system/pause and /api/system/resume from your own network, for example from a home automation system on a dynamic electricity tariff. When solo mining, each paused hour costs exactly that hour’s block chance, nothing more. The miner only draws no power at all when the supply is unplugged.
Your own node belongs in the calculation
If you also run your own Bitcoin node, for example for Public Pool on Umbrel, add its consumption with the same formula and ideally measure it at the wall as well. What a node gives you and which hardware makes sense is in running your own Bitcoin node, connecting the miner to it in connecting a Bitaxe to your own node and the basics in solo mining.
Frequently asked questions about power consumption
How much power does a Bitaxe Gamma use?
What does a Bitaxe cost to run per month and per year?
Does AxeOS show the real power consumption?
How much power does a NerdQaxe++ need?
Is a Bitaxe worth it at €0.30 per kWh?
At what electricity price does a Bitaxe cover its power?
How much more does overclocking cost?
Can I lower the power draw without losing hashrate?
Does a Bitaxe heat the room?
Can I run a Bitaxe on solar power?
Does a paused Bitaxe still use power?
How do I measure power consumption properly?
Matching products


Read more
Nerdaxe Gaia: what the BM1373 miner can do, which firmware to run and who it is for
A single BM1373 in the familiar Nerdaxe format: factory settings from the source code, hashrate and power draw with every documented figure, the 12-volt power supply, OSM-OS from the flasher, setup, overclocking up to the current limit, block odds and electricity cost, plus a comparison with the Nerdaxe Gamma, Bitaxe GT and NerdQaxe++.
Guides & knowledgeSetting up Stratum V2 on a Bitaxe: encrypted solo mining in five fields
Since AxeOS 2.14 every Bitaxe speaks Stratum V2, and since September 2026 so does the Bitaxe Pool. This guide walks through the AxeOS fields one by one, shows how to set up the fallback and verify the connection, and lists what goes wrong when no shares arrive. For Bitaxe, NerdQaxe and large ASICs.
Guides & knowledgeNerdQaxe++ review: 4.8 TH/s from four BM1370, and who should upgrade from a Bitaxe
Four BM1370 on one board, 4.9 TH/s expected out of the box, about 76 W, two fans and NerdOS in the browser: we put the NerdQaxe++ in context. Factory values from the firmware, board revisions, noise, running costs, block odds, setup in NerdOS and the comparison with the Bitaxe Gamma, GT and 702, Copper Pro, Hydro, NerdQX and NerdOctaxe.